This is a very common shot in any spy/action/secret agent story:
To achieve this you start off with opening your scene and placing all your animation into one Graphic Symbol.
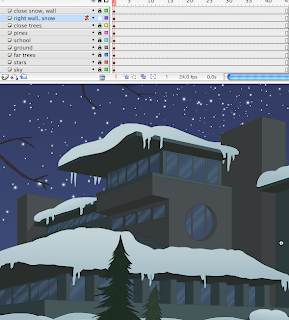
In this case all I have are the many different levels that compromise this background. It doesn't matter how much animation or how many layers and symbols you have within your scene, the more complex the greater the render time, otherwise you can have all the movement and madness you wish, it won't matter.
Copy all your animation into one self-contained symbol so your timeline is just one layer and one key holding all your animation. Make a new layer on top for your binoculars overlay.
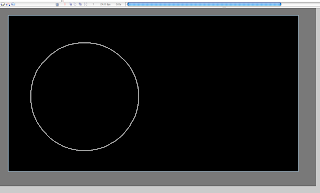

Make a giant black square that covers your entire canvas, then click and drag (holding down SHIFT) to make two circles with the OVAL tool. Click and delete the paint from the ovals and any outlines you may have. Now you have the cut-out POV of the binoculars.
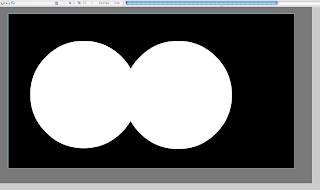
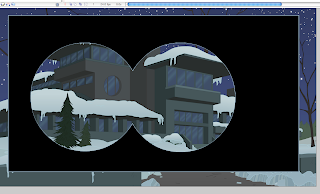 Now select all the artwork on this top layer and make it into a Movie Clip Symbol.
Make sure your Filters Window is open, and choose the Blur filter from the "+" button, type in the numbers 15 for your values and HIGH for the quality.
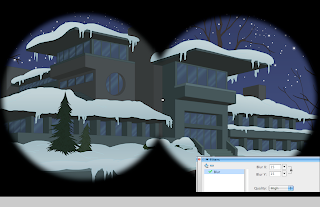
Now you're ready to add a bit of a shaky camera effect. Place keyframes along the timeline, one at a time, F6 then shift up or down, left or right the symbol containing all your animation, you can change the size of it as well, but I'd recommend no more than 5% difference at a time if your key frames are fairly close together, you don't want an overly fast zoom in or out. the more spacing you make the more distance you'll cover and the faster the moves will be.


Of course once you're done plotting out your keys of slightly shifted and/or scaled symbol across the timeline, you tween all the keys. In this case there's only a bit of an "ease in" on the middle and second to last key frame to add a bit of variety so the tween aren't too repetitive and too even in speed.
Looking like this:
And with the blurry overlay:
Now comes the fun part. Making the animation look like it's going in and out of focus.
 Make a new layer and copy and drag a set of frames that holds two keys with tweens between them. As shown below, copy the first frames (including the start and end position of one of your tweens) and copy them on top, then hit F6 to keyframe all the frames, then right click or go to the Properties window to Remove the Tween.


You've essentially copied the camera move containing all the animation on another layer, now key framed and ready to by "symbolized".

Repeat the process a few more times, grabbing frames that aren't in mid-tween is easiest and makes most sense with the whole focusing while moving/zooming concept.
Make sure you have a blank key frame at the end of each group of keys you create. Now go frame by frame (the only boring part) and click on the frame to select all the artwork on that frame and hit F8 to convert it into a MOVIE CLIP symbol.
Have that Filters Window handy because you're going to go frame by frame to add progressive blurs. Now start with the first key and give it only a Blur value of "2". and each frame after that go up by one each time (make sure the Quality is HIGH) go up to 5 (or 7 depending on how long the tween originally was, the longer the tween the more keys in each chunk you may have). Frame by frame progressively go up then down to simulate a gradual focused image to blurry to focus again. Start with 2 then 3, 4, 5, 6, 5, 4, 3, 2. Is what it could look like once your done and click on the symbol frame by frame as you go ahead on the timeline to continue with the increase and decrease in blur intensity.
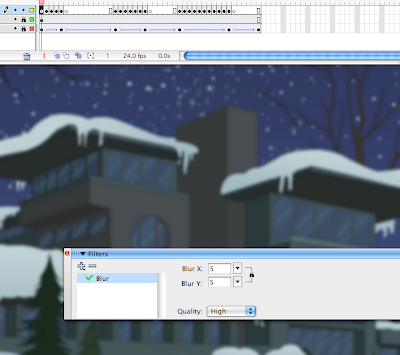
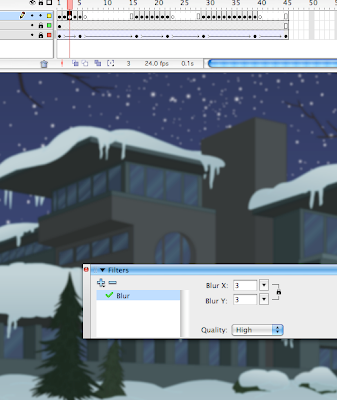
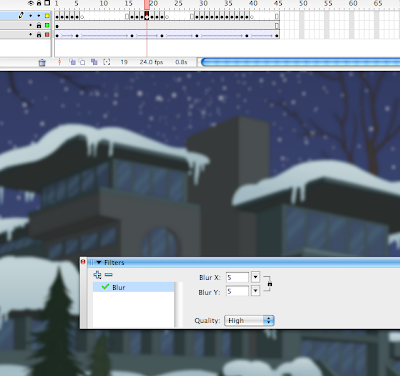
Here's an alternative, zoom in and blur effect at once.
The timeline would look like this each frame would be set to an increasing blur increments of 1 going from 1 to 9 then back to 1 within 18 frames.

And there you have it. Make sure your 'binoculars layer' is on top of everything, render a line test and see how it works. This is an effect that I'm sure After Effects can do quick and simple, but the principles in this technique can be used in many different situations beyond just camera stuff in Flash. But if you don't have After Effects on your personal computer than you can experiment with this theory further with any isolated FX, symbol, water, smoke, fire, steam, fumes can all benefit from a good softened effect like this. But it's not too shabby for 5-10 minutes of work, 3 layers, and not too memory intensive.
Here's the Flash file for download.
Tutorials coming soon: More smoke! Some rain! And later on some hand-drawn Flash FX tips & techniques for water ripples, fires and explosions! Till then read this inspiring article on The Classical Art of Hand-Drawn Effects Animation by Flash FX Master Joe Gilland.

Nice idea to make FlashFx blog! I was often read your posts about FlashFX on your collideascope blog. Good luck and more posts!
ReplyDeleteGlad you like it. Thanks alot!
ReplyDelete