Chris is an FX animator in Ottawa working with ToonBoom.
His style and design is impeccable and exquisite as he executes flawless fluidity in his timing and subtle nuances, giving character to these effects animation tests.
See his Vimeo site here. He'll surely be placing more clips and tests someday, make sure to see them.
Here's a fire test he made in Flash. Included are the roughs to show his progression.
Lastly, here's another quick clip he made in Flash.
Visit his blog, showcasing plenty of nice designs.

Dec 3, 2009
Nov 10, 2009
#9 - Smoke Burst
So here's a simple one, a burst of smoke, very handy when you need a character to zip off screen, or to use in multiples for an explosion of dirt or dust, or even an impact of a character hitting a solid object.
Take that brush tool out and start drawing. The first 3 drawings are the easiest. Shoot them on 1s (meaning have them back to back on your timeline exposed for only one frame each).
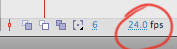
 Make certain you're working at 24 frames per second too.
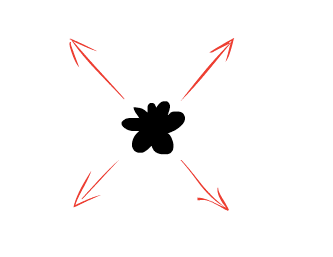
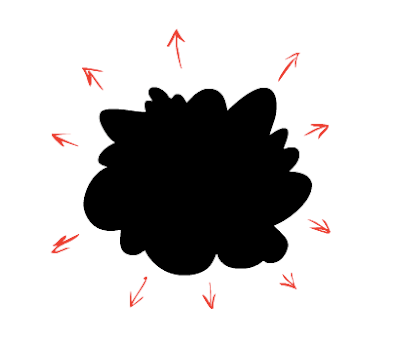
Your first drawing should just be a small blob. Draw with the Brush, then fill it in (with a different color if you wish) with the Paint Bucket.
 Sometimes I key out some bursts with a key drawings just to see where I'm starting and where I'm going as I build the general shape of the form, otherwisem animating frame by frame usually works. Press F7 to make a new blank keyframe, and with the Onion Skin ON, draw the new expanded shape of the smoke cloud.
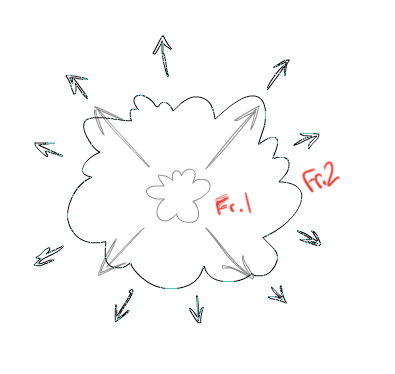 Below is the 2nd frame, covering a lot of distance to show the long spacing between the drawings (as shown above). The initial expansion is huge, after these first 3 drawings (on 1s).
Then the 3rd drawing reaches quite large and now from this point forward we can animate on 2s.
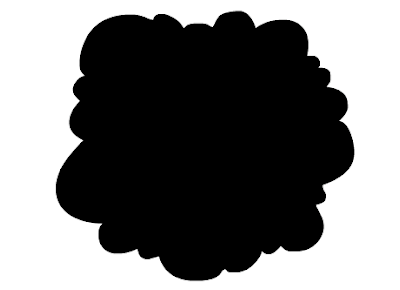
Your first 3 drawings overlapping each other should look something like this.
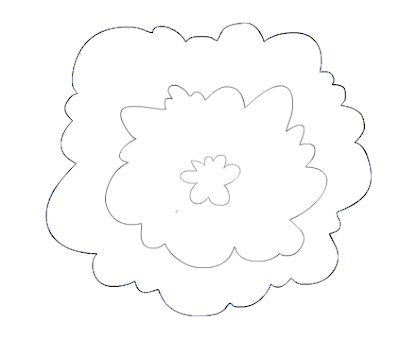
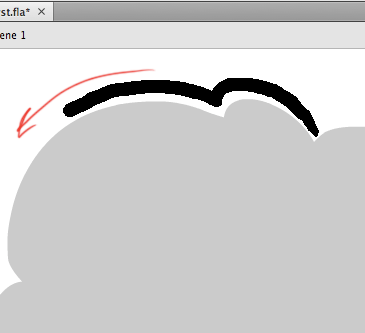
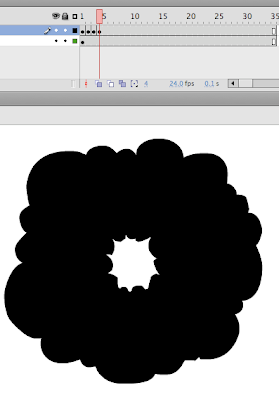
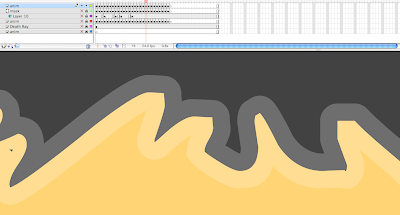
On the 4th drawing the spacing between our drawings (for the outer edge of the cloud's form) is very tight, making the outer rim of the smoke move slowly (all on 2s from now on). Always working with that Onion Skin activated, drawing the outer edge of the smoke cloud is very easy simply trace over top of your previous drawing (on your new blank key frame at frame 4). The spacing between your drawings (for the outer edge) will now always be very small, so as you trace over you're gradually expanding the outer rim of the cloud's shape more and more every frame. The closer you draw over top of the previous drawings position the slower the cloud will expand. Draw with the Brush then fill it in with the Paint Bucket, frame by frame.
Also on Frame 4 you need to start the smoke's break up pattern. Start off with a hole in the middle, this hole will initially start off fast (sort of like how the overall form of your smoke cloud did for the first 3 frames).
So here's a slow motion version of what you should have so far, with some notes along the way:
That was easy, now as we get closer to the end it gets to be more tedious, but the more time you put into it, the smoother it will be. As you get gradually expand the inner hole closer to the outer rim, you have to start making decisions as to which chunks will actually form when you run out of room and are forced to begin breaking peices off, all the while the entire cloud shape is ALWAYS slowly expanding outwards. As you can see below, you can barely see my Onion Skin is ON and I can see the previous frame as I draw the ever-expanding inner hole - no jokes please : )
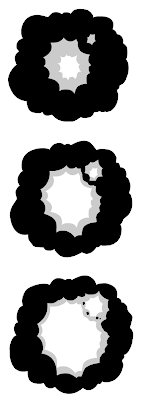 I decided to make a small secondary hole too, and within the next 3 drawings had that merge with the larger primary gap puncturing through.
Now frames 12, 14, 16, 18, and 20: the inner gap is catching up with the always-slowly-expanding outer edge (click image below to enlarge).
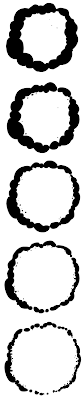
My smoke cloud here turned out to be more circular that I had hoped, to make it look more natural (even though it's a quite cartoony design) would be to add more randomness to that outer shape of the smoke cloud, but this will work OK. The last 5 drawings now are for the donut-shaped cloud to continue dissipating and breaking up into nothing.
Zoom in close, moving around with the spacebar, and keeping that Onion Skin on you go frame by frame, F7 to make the new blank keyframe , then start drawing the donut shape breaking apart. Keeping track of each little bit can be difficult, but the more consistent you keep it and the more gradual you slowly break the peices up, the better it will look in the end.
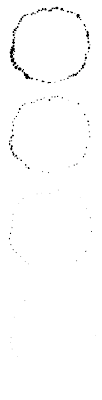
When you get down to the last 2 or 3 drawings, you have to decide which tiny bits are simply going to "pop off" and which larger clusters will have to change on for a few more frames as they slowly shrink and dissolve away.
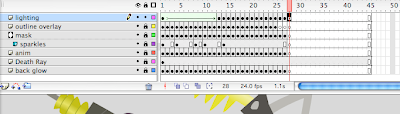
My timeline looked like this when I was done, drawing on every second frame after the intital burst out.

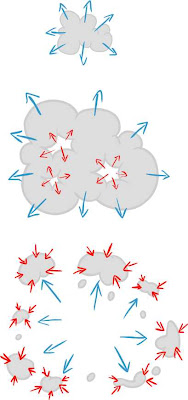
Remember, a fast initial blast out, then a gap (or multiple gaps) expanding outwards from the core, to eventually meet up with the ever-slowly-expanding outer rim, until you only have tiny bits breaking apart and shrinking into nothing.
Here's more samples using the same theories:
Hope this was helpful.
Here's the Flash CS3 file to download.
Take that brush tool out and start drawing. The first 3 drawings are the easiest. Shoot them on 1s (meaning have them back to back on your timeline exposed for only one frame each).
 Make certain you're working at 24 frames per second too.
Your first drawing should just be a small blob. Draw with the Brush, then fill it in (with a different color if you wish) with the Paint Bucket.

Activate your onion skin move the range finder to only include the previous drawing. Smoke as simple as this one works well by animating "straight-ahead".
 Smoke as simple as this one works well by animating "straight-ahead".
 Sometimes I key out some bursts with a key drawings just to see where I'm starting and where I'm going as I build the general shape of the form, otherwisem animating frame by frame usually works. Press F7 to make a new blank keyframe, and with the Onion Skin ON, draw the new expanded shape of the smoke cloud.
 Below is the 2nd frame, covering a lot of distance to show the long spacing between the drawings (as shown above). The initial expansion is huge, after these first 3 drawings (on 1s).
Then the 3rd drawing reaches quite large and now from this point forward we can animate on 2s.

Your first 3 drawings overlapping each other should look something like this.

On the 4th drawing the spacing between our drawings (for the outer edge of the cloud's form) is very tight, making the outer rim of the smoke move slowly (all on 2s from now on). Always working with that Onion Skin activated, drawing the outer edge of the smoke cloud is very easy simply trace over top of your previous drawing (on your new blank key frame at frame 4). The spacing between your drawings (for the outer edge) will now always be very small, so as you trace over you're gradually expanding the outer rim of the cloud's shape more and more every frame. The closer you draw over top of the previous drawings position the slower the cloud will expand. Draw with the Brush then fill it in with the Paint Bucket, frame by frame.

Also on Frame 4 you need to start the smoke's break up pattern. Start off with a hole in the middle, this hole will initially start off fast (sort of like how the overall form of your smoke cloud did for the first 3 frames).

So here's a slow motion version of what you should have so far, with some notes along the way:
That was easy, now as we get closer to the end it gets to be more tedious, but the more time you put into it, the smoother it will be. As you get gradually expand the inner hole closer to the outer rim, you have to start making decisions as to which chunks will actually form when you run out of room and are forced to begin breaking peices off, all the while the entire cloud shape is ALWAYS slowly expanding outwards. As you can see below, you can barely see my Onion Skin is ON and I can see the previous frame as I draw the ever-expanding inner hole - no jokes please : )
 I decided to make a small secondary hole too, and within the next 3 drawings had that merge with the larger primary gap puncturing through.
Now frames 12, 14, 16, 18, and 20: the inner gap is catching up with the always-slowly-expanding outer edge (click image below to enlarge).

My smoke cloud here turned out to be more circular that I had hoped, to make it look more natural (even though it's a quite cartoony design) would be to add more randomness to that outer shape of the smoke cloud, but this will work OK. The last 5 drawings now are for the donut-shaped cloud to continue dissipating and breaking up into nothing.
Zoom in close, moving around with the spacebar, and keeping that Onion Skin on you go frame by frame, F7 to make the new blank keyframe , then start drawing the donut shape breaking apart. Keeping track of each little bit can be difficult, but the more consistent you keep it and the more gradual you slowly break the peices up, the better it will look in the end.

When you get down to the last 2 or 3 drawings, you have to decide which tiny bits are simply going to "pop off" and which larger clusters will have to change on for a few more frames as they slowly shrink and dissolve away.
My timeline looked like this when I was done, drawing on every second frame after the intital burst out.


Remember, a fast initial blast out, then a gap (or multiple gaps) expanding outwards from the core, to eventually meet up with the ever-slowly-expanding outer rim, until you only have tiny bits breaking apart and shrinking into nothing.
Here's more samples using the same theories:
Hope this was helpful.
Glows
 Click image to enlarge
Above is a quick breakdown of how to do 'Glows' in Flash that I had quickly done for a friend of mine. It's fast and simple that's for sure, but it gives you the basic idea, here's the Flash file to go with it.
And here is the video file from a previous post regarding Eric Spiegelman's Time Lapse Film: Download
And here is the video file from a previous post regarding Eric Spiegelman's Time Lapse Film: Download
Oct 27, 2009
Why wield a whip when you can be the whip?
Scott Peterson has been busy during his time off from being an Effects Supervisor at PDI/Dreamworks. Inspired by games like Battlezone, Geometry Wars and Michel Gagne's special effects style, his latest project was diving into the world of game development. Focusing his efforts on an appealing visual effects aesthetic complemented by simple, abstract game actors, and a unique game mechanic that gives players a new gaming experience, his endeavors has lead to the original game labeled "WhipCrack".
This game lets you assume control of a space-age whip as you crack through swarms of deadly enemies. Solve puzzles, earn upgrades, and fling your master across the screen while battling across 19 devious single-player missions.
Gameplay Trailer:
Here's the link to the game's website.
This game lets you assume control of a space-age whip as you crack through swarms of deadly enemies. Solve puzzles, earn upgrades, and fling your master across the screen while battling across 19 devious single-player missions.
Gameplay Trailer:
Here's the link to the game's website.
Oct 10, 2009
Incredible Slow Motion Video Of Bullet Impacts On Various Materials
A 10-minute video showing the impact of bullets on various targets at 1 million frames per second. It was made by German engineer Werner Mehl who created the PVM-21 infrared chronograph, in many respects the most sophisticated ballistic speed-measuring system. There's so much amazing video reference out there online for FX animators, this is just another one of hundreds of great clips you can find. More Tutorials coming soon, I promise.
Sep 16, 2009
Awesome Flash FX in these 'Coke Burn' Commercials
The 2D Art & Animation Crew:
Kathleen Quaife, Philip Pignotti, John Armstrong, Jeff Zikry, Kendra Ryan, Joe Mullen, and Jon Gorman.
Sep 1, 2009
Eric Spiegelman's Time Lapse Film
I know I'm slacking on the actual tutorials, but I'll be making lots of new posts this month, I promise!
Aug 30, 2009
Insanely Twisted Shadow Planet
I love Michel Gagne’s work - he's one of our modern-day masters of 2D-animated special effects, here's his latest project:
Gagne writes more about this forthcoming video game project on his blog.
May 17, 2009
Resources, Resources, Resources
The internet has unlimited quantities of research material the effects animators.
Here's just a few high-contrast black and white clips I've found recently, awesome video footage of ink drops in water and splatters of paint on a flat surfaces.
Download:
Ink Drops (25 files / 52 MB)
Ink Flows (10 files / 94 MB)
Paint Splatter (20 files / 4 MB)
Samples:
Enjoy.
Here's just a few high-contrast black and white clips I've found recently, awesome video footage of ink drops in water and splatters of paint on a flat surfaces.
Download:
Ink Drops (25 files / 52 MB)
Ink Flows (10 files / 94 MB)
Paint Splatter (20 files / 4 MB)
Samples:
Enjoy.
May 3, 2009
#8 - Laser Blast (Proton Stream Edition)
PART 1
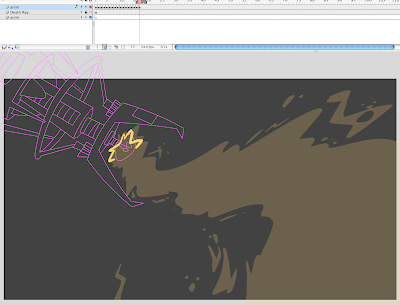
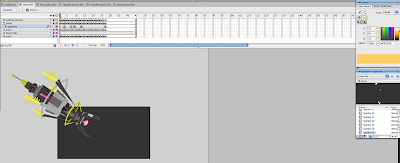
Let's start with the actual foundation of it and that's the actual animation of the beam or energy blast shooting out. Whether it's a cycle or just one big burst, you must create (or maintain the pre-established) the design, keeping it consistent with itself (and perhaps the series or film you are doing the FX for).
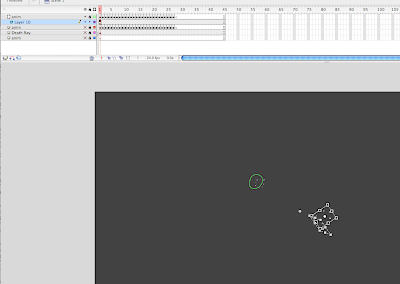
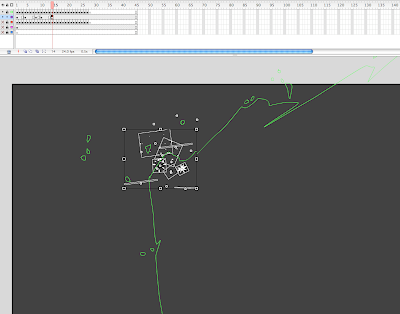
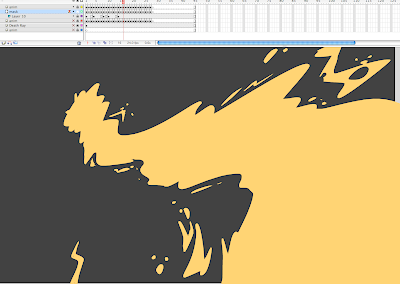
With the brush tool, here you see how I went in frame by frame (on 1s) and drew in a Ghostbusters style proton beam bursting out. No cycle in this version, though it's easy to incorporate one between the energy 'build-up' and the 'dissipation' portions on your timeline.
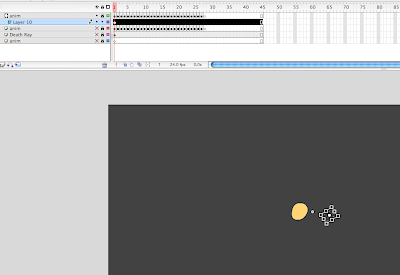
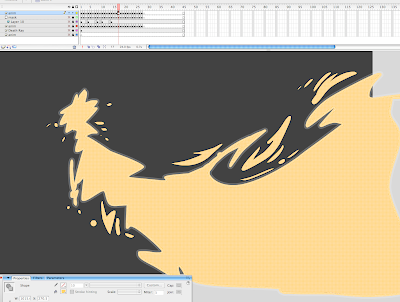
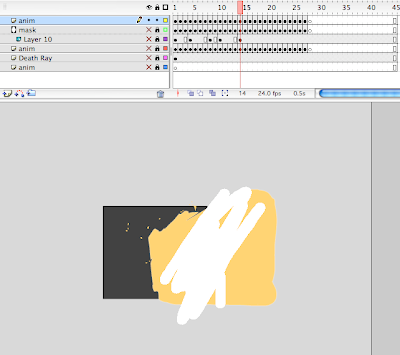
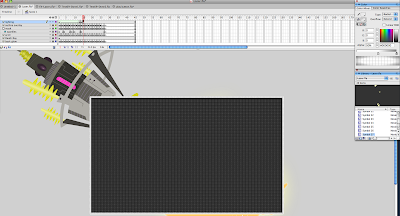
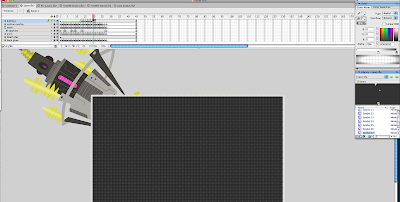
Get your prop ready, in this case a cartoony Death Ray device from some Mad Scientist's laboratory. Make it an outline by clicking on the small box on its layer, create a new blank layer above and below the prop, lock all the layers except the top one and work on this top layer, with the prop layer set to OUTLINE, you can see through it. Activate your ONION SKIN Button just below your timeline, now start drawing.
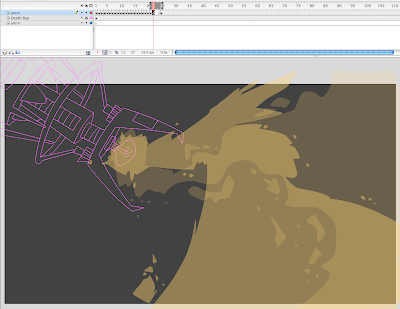
With that onion skin on you can copy frames over and make sure your drawings 'hook-up' if you do indeed have a cycle amongst the animation. A possible scenario would be 10 frames of the beam activating, then a 6 frame cycle as it repeats a few times then another 6 frames of the beam deactivating and the proton stream dissipating. You'd be surprised how rough you can keep your lines and shapes as well, since it moves or 'vibrates' quite fast you can get away with alot. If you like to work very rough, then make a second pass to clean up your lines.
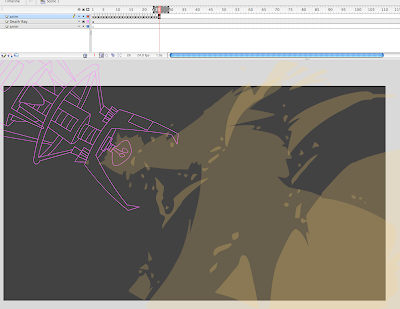
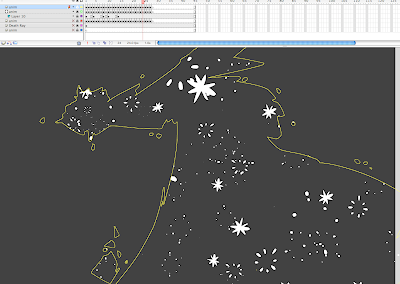
Once complete pick you color(s) and and paint in all the shapes and gaps and any small bits of electricity or speckles trailing off or sparking from the beam.
PART 2
Once you've animated your beam, copy the keys to a new layer.
Click the new layer button, click and drag to select all the frames and then drag them over to the new layer while holding ALT down.
Lock and hide all other layers.
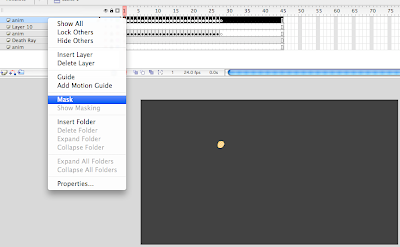
Select this new top layer holding a duplicate copy of all your animation.
Make a new layer on top of that again.
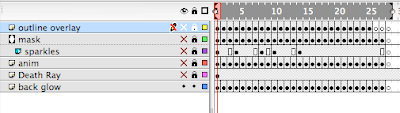
Drag this new layer down one level, then right click on the top layer (the same one holding a duplicate copy of all your animation) and choose MASK.
This will turn your animation into a mask layer, the blank layer underneath becomes a sublayer (the level that will later by effected by your mask).
Make your Mask layer an outline so that you can keep track of the amount of space the mask will cover, and lock the mask layer.
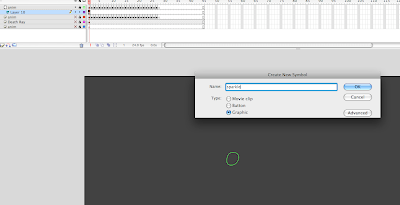
On the layer underneath click on the blank keyframe then go to Insert > New Symbol.
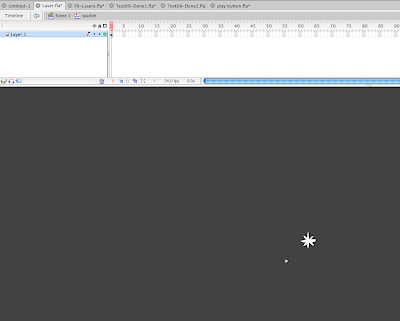
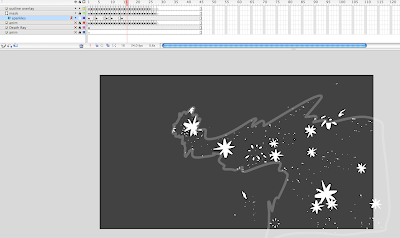
Create a single cycle of a small star twinkle, a bubble pop, any sort of 4 to 8 frame sparkle / fizzy pop sort of thing.
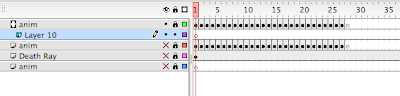
Once complete, go back to your main scene timeline, drag over your symbol from the LIBRARY to the stage.
Then begin copy/pasting this symbol, over and over, each one change the scale, rotation, and even flip a few over vertically and/or horizontally to create tons of variety.
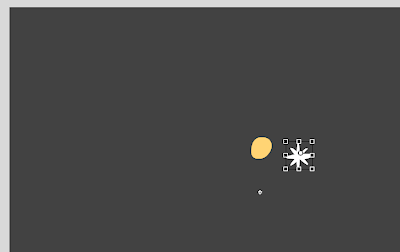
As you go through the timeline, keyframe and add more symbols and clusters of symbols of the sparkle symbol, go through and select random individual ones and change at what point they begin. This creates even more randomness, appearing as though you animated a sea of twinkle sparks. In this case I had a 6 frame cycle, so most of the symbols I select one at a time I change the First box in the Properties Panel: from 1 to 2, 3, 4, 5 or 6.
Remember, you can only see the effects of the mask when you have both the mask layer and its sub-layer both locked.
PART 3
Create a New Layer.
Now take your original animation again and duplicate it on to another layer on top of all the other layers.
Lock and Hide all other layers.
Choose your stroke color to a semi-transparent white ALPHA color.
Go in frame by frame and click on all the paint with the INK BOTTLE tool (choose the thickness of the stroke to 10).
This may be difficult to do if you have lots of tiny bits. but the purpose of this is to create a nice softened edge to at least the main (larger) shape of your laser beam.
Do this for every frame.

As you can see when you zoom in close the stroke thickness covers as much on the outside of the outline as it does on the inside, so the color of your outlines and your paint fills will give differetn effects depending on how transparent you set the alpha and how dark (or light) you set the colors of the laser itself (which will show through underneath).
Now click on your ERASER tool from the tools panel, change the settings of the eraser to ERASE FILLS.

Go in frame by frame and erase the colored paint (leaving the outlines intact).
To help make this easier, use the biggest eraser brush and zoom out as far as you can go, this will make the task go much faster.
Locking the layers and making them all visible (except the bottom few layers which holds you original animation), you'll notice the alpha-outlined shape encasing the masked twinkle sparks.
PART 4
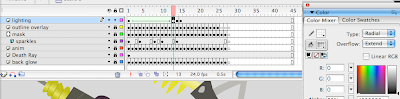
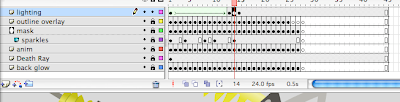
Once again copy all your keys of the original animation to the BOTTOM layer underneath the prop layer.
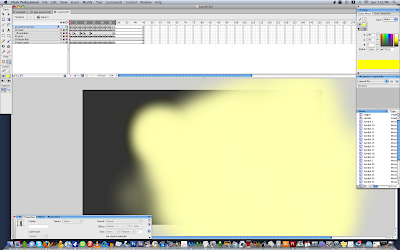
click the EDIT MULTIPLE FRAMES button, drag the small knobs over to cover the whole range of the time line, hit CTRL+A to select all the art on ONLY that bottom layer (make sure all other layers are locked and hidden). Change the color to all the animation at once, usually a lighter color than the original base color works best, close to a white color will do. If your original base color was quite light or highly saturated, perhaps a deeper hue will work best, it depends on the background color you choose later.
Then click on each individual frame and COVERT TO SYMBOL (F8) each separate frame of animation.
Make sure each one is MOVIE CLIP symbol. Otherwise all symbol you create must be Graphic Symbols. But in this case MOVIE CLIP symbols are vital for the back lit glow effect.
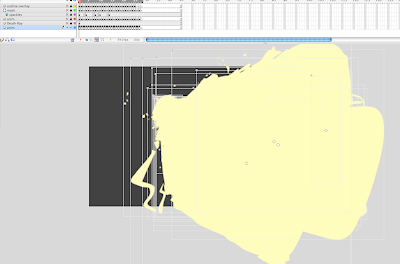
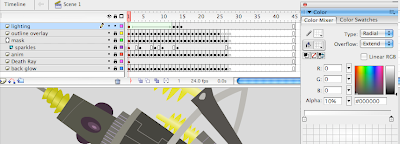
Once you've converted the artwork on each individual frame to it's own symbol (on this case 27 symbols) click the EDIT MULTIPLE FRAMES button, drag the small knobs over to cover the whole range of the time line, hit CTRL+A to select all the art on ONLY that bottom layer (make sure all other layers are locked and hidden).
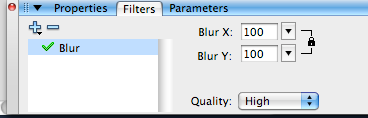 Open the Filters Panel, click on the Plus sign, choose BLUR, raise the numbers to whatever amount you would like to see, the greater the number the more diffused the glow will appear. Set the quality to high.
Make your original animation layer visible and compare how the back lit glow looks with the other layers overlapping it. Adjust accordingly.
PART 5
Now for the final touch. A bit of lighting FX.
This may not be appropriate depending on the style you're going for, or how the scene plays out with the background elements.
Create a new layer over top all other.
With the RECTANGLE tool cover the whole scene with a new shape.
Adjust the fill of that shape with a radial gradient.
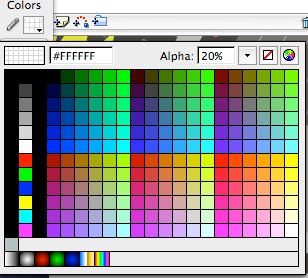
In this case I went with a black 20% to 0% alpha gradient, clicked and dragged the source of the gradient tool so it's center is just in front of the muzzle of the laser beam.
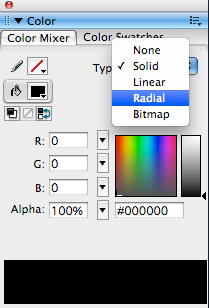
Then keyframe down the timeline (at the point where the laser begins to cover more space) and change the gradient again to make the more opaque part of the gradient LESS transparent / more black). this will help put more focus on the beam and give the illusion the beam is intensifying in brightness by making everythign else gradually get darker and the a bit f a strobe light effect during th big blast (or cycle) portion of the animation.
Set you first key frame to a shape tween to activate the morph of the color effect.
Then key frame a few afterwards during the portion where the beam dissipates, and gradually reduce the transparency of the radial gradient so that it disappears, thus fading away the lighting effect.

Make sure you have blank keyframes inserted where you need to so that certain elements don't stick around past the timing of your animation.
Select all the frames and copy the frames into it's own symbol if you'd like, then you isolate all the animation into a single (easy to manipulate) keyframe.
Here's two more samples, with the same technique, just using different colors, and design styles.
Let's start with the actual foundation of it and that's the actual animation of the beam or energy blast shooting out. Whether it's a cycle or just one big burst, you must create (or maintain the pre-established) the design, keeping it consistent with itself (and perhaps the series or film you are doing the FX for).
With the brush tool, here you see how I went in frame by frame (on 1s) and drew in a Ghostbusters style proton beam bursting out. No cycle in this version, though it's easy to incorporate one between the energy 'build-up' and the 'dissipation' portions on your timeline.

Get your prop ready, in this case a cartoony Death Ray device from some Mad Scientist's laboratory. Make it an outline by clicking on the small box on its layer, create a new blank layer above and below the prop, lock all the layers except the top one and work on this top layer, with the prop layer set to OUTLINE, you can see through it. Activate your ONION SKIN Button just below your timeline, now start drawing.


With that onion skin on you can copy frames over and make sure your drawings 'hook-up' if you do indeed have a cycle amongst the animation. A possible scenario would be 10 frames of the beam activating, then a 6 frame cycle as it repeats a few times then another 6 frames of the beam deactivating and the proton stream dissipating. You'd be surprised how rough you can keep your lines and shapes as well, since it moves or 'vibrates' quite fast you can get away with alot. If you like to work very rough, then make a second pass to clean up your lines.
Once complete pick you color(s) and and paint in all the shapes and gaps and any small bits of electricity or speckles trailing off or sparking from the beam.
PART 2

Once you've animated your beam, copy the keys to a new layer.
Click the new layer button, click and drag to select all the frames and then drag them over to the new layer while holding ALT down.
Lock and hide all other layers.
Select this new top layer holding a duplicate copy of all your animation.
Make a new layer on top of that again.
Drag this new layer down one level, then right click on the top layer (the same one holding a duplicate copy of all your animation) and choose MASK.
This will turn your animation into a mask layer, the blank layer underneath becomes a sublayer (the level that will later by effected by your mask).

Make your Mask layer an outline so that you can keep track of the amount of space the mask will cover, and lock the mask layer.
On the layer underneath click on the blank keyframe then go to Insert > New Symbol.
Create a single cycle of a small star twinkle, a bubble pop, any sort of 4 to 8 frame sparkle / fizzy pop sort of thing.


Once complete, go back to your main scene timeline, drag over your symbol from the LIBRARY to the stage.
Then begin copy/pasting this symbol, over and over, each one change the scale, rotation, and even flip a few over vertically and/or horizontally to create tons of variety.


As you go through the timeline, keyframe and add more symbols and clusters of symbols of the sparkle symbol, go through and select random individual ones and change at what point they begin. This creates even more randomness, appearing as though you animated a sea of twinkle sparks. In this case I had a 6 frame cycle, so most of the symbols I select one at a time I change the First box in the Properties Panel: from 1 to 2, 3, 4, 5 or 6.

Remember, you can only see the effects of the mask when you have both the mask layer and its sub-layer both locked.
PART 3
Create a New Layer.
Now take your original animation again and duplicate it on to another layer on top of all the other layers.
Lock and Hide all other layers.
Choose your stroke color to a semi-transparent white ALPHA color.

Go in frame by frame and click on all the paint with the INK BOTTLE tool (choose the thickness of the stroke to 10).
This may be difficult to do if you have lots of tiny bits. but the purpose of this is to create a nice softened edge to at least the main (larger) shape of your laser beam.
Do this for every frame.


As you can see when you zoom in close the stroke thickness covers as much on the outside of the outline as it does on the inside, so the color of your outlines and your paint fills will give differetn effects depending on how transparent you set the alpha and how dark (or light) you set the colors of the laser itself (which will show through underneath).
Now click on your ERASER tool from the tools panel, change the settings of the eraser to ERASE FILLS.

Go in frame by frame and erase the colored paint (leaving the outlines intact).


To help make this easier, use the biggest eraser brush and zoom out as far as you can go, this will make the task go much faster.

Locking the layers and making them all visible (except the bottom few layers which holds you original animation), you'll notice the alpha-outlined shape encasing the masked twinkle sparks.
PART 4
Once again copy all your keys of the original animation to the BOTTOM layer underneath the prop layer.
click the EDIT MULTIPLE FRAMES button, drag the small knobs over to cover the whole range of the time line, hit CTRL+A to select all the art on ONLY that bottom layer (make sure all other layers are locked and hidden). Change the color to all the animation at once, usually a lighter color than the original base color works best, close to a white color will do. If your original base color was quite light or highly saturated, perhaps a deeper hue will work best, it depends on the background color you choose later.
Then click on each individual frame and COVERT TO SYMBOL (F8) each separate frame of animation.
Make sure each one is MOVIE CLIP symbol. Otherwise all symbol you create must be Graphic Symbols. But in this case MOVIE CLIP symbols are vital for the back lit glow effect.
Once you've converted the artwork on each individual frame to it's own symbol (on this case 27 symbols) click the EDIT MULTIPLE FRAMES button, drag the small knobs over to cover the whole range of the time line, hit CTRL+A to select all the art on ONLY that bottom layer (make sure all other layers are locked and hidden).

 Open the Filters Panel, click on the Plus sign, choose BLUR, raise the numbers to whatever amount you would like to see, the greater the number the more diffused the glow will appear. Set the quality to high.


Make your original animation layer visible and compare how the back lit glow looks with the other layers overlapping it. Adjust accordingly.
PART 5
Now for the final touch. A bit of lighting FX.
This may not be appropriate depending on the style you're going for, or how the scene plays out with the background elements.
Create a new layer over top all other.
With the RECTANGLE tool cover the whole scene with a new shape.
Adjust the fill of that shape with a radial gradient.
In this case I went with a black 20% to 0% alpha gradient, clicked and dragged the source of the gradient tool so it's center is just in front of the muzzle of the laser beam.


Then keyframe down the timeline (at the point where the laser begins to cover more space) and change the gradient again to make the more opaque part of the gradient LESS transparent / more black). this will help put more focus on the beam and give the illusion the beam is intensifying in brightness by making everythign else gradually get darker and the a bit f a strobe light effect during th big blast (or cycle) portion of the animation.
Set you first key frame to a shape tween to activate the morph of the color effect.
Then key frame a few afterwards during the portion where the beam dissipates, and gradually reduce the transparency of the radial gradient so that it disappears, thus fading away the lighting effect.


Make sure you have blank keyframes inserted where you need to so that certain elements don't stick around past the timing of your animation.
Select all the frames and copy the frames into it's own symbol if you'd like, then you isolate all the animation into a single (easy to manipulate) keyframe.
Here's two more samples, with the same technique, just using different colors, and design styles.
Subscribe to:
Posts (Atom)