The internet has unlimited quantities of research material the effects animators.
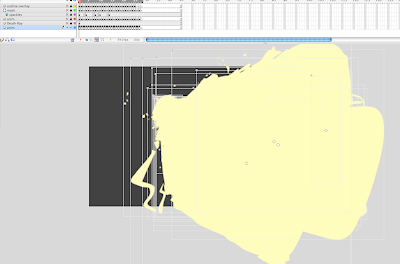
Here's just a few high-contrast black and white clips I've found recently, awesome video footage of ink drops in water and splatters of paint on a flat surfaces.
Download:
Ink Drops (25 files / 52 MB)
Ink Flows (10 files / 94 MB)
Paint Splatter (20 files / 4 MB)
Samples:
Enjoy.

May 17, 2009
May 3, 2009
#8 - Laser Blast (Proton Stream Edition)
PART 1
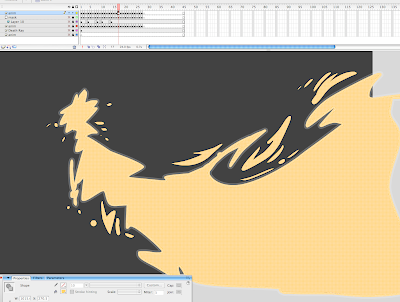
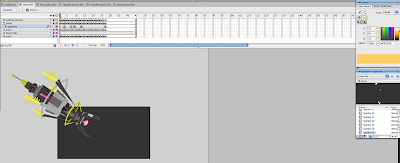
Let's start with the actual foundation of it and that's the actual animation of the beam or energy blast shooting out. Whether it's a cycle or just one big burst, you must create (or maintain the pre-established) the design, keeping it consistent with itself (and perhaps the series or film you are doing the FX for).
With the brush tool, here you see how I went in frame by frame (on 1s) and drew in a Ghostbusters style proton beam bursting out. No cycle in this version, though it's easy to incorporate one between the energy 'build-up' and the 'dissipation' portions on your timeline.
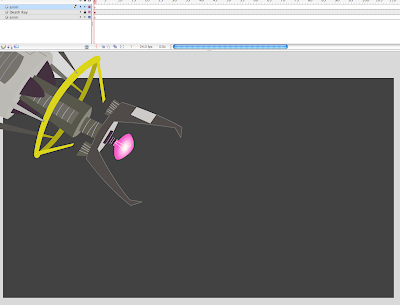
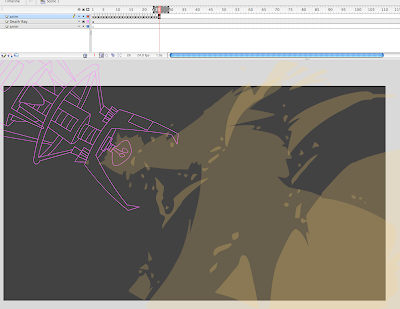
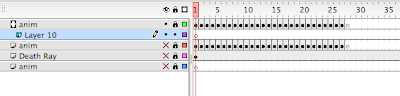
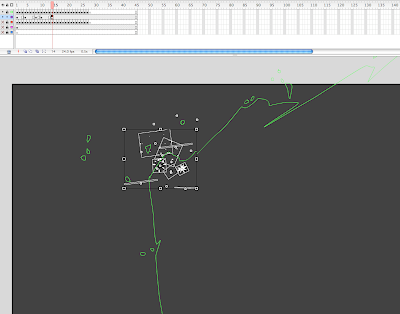
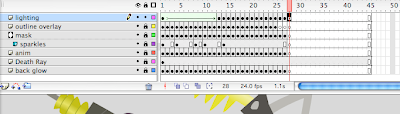
Get your prop ready, in this case a cartoony Death Ray device from some Mad Scientist's laboratory. Make it an outline by clicking on the small box on its layer, create a new blank layer above and below the prop, lock all the layers except the top one and work on this top layer, with the prop layer set to OUTLINE, you can see through it. Activate your ONION SKIN Button just below your timeline, now start drawing.
With that onion skin on you can copy frames over and make sure your drawings 'hook-up' if you do indeed have a cycle amongst the animation. A possible scenario would be 10 frames of the beam activating, then a 6 frame cycle as it repeats a few times then another 6 frames of the beam deactivating and the proton stream dissipating. You'd be surprised how rough you can keep your lines and shapes as well, since it moves or 'vibrates' quite fast you can get away with alot. If you like to work very rough, then make a second pass to clean up your lines.
Once complete pick you color(s) and and paint in all the shapes and gaps and any small bits of electricity or speckles trailing off or sparking from the beam.
PART 2
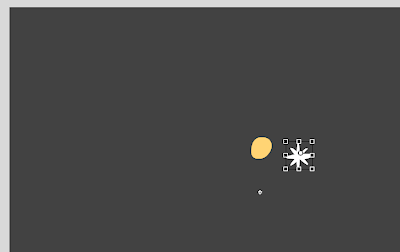
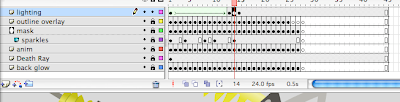
Once you've animated your beam, copy the keys to a new layer.
Click the new layer button, click and drag to select all the frames and then drag them over to the new layer while holding ALT down.
Lock and hide all other layers.
Select this new top layer holding a duplicate copy of all your animation.
Make a new layer on top of that again.
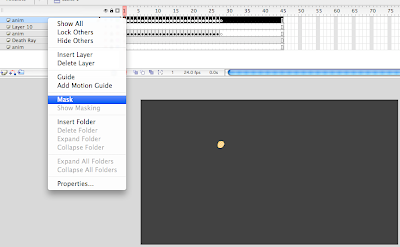
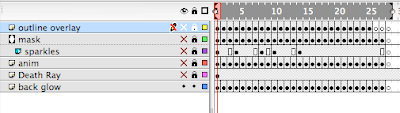
Drag this new layer down one level, then right click on the top layer (the same one holding a duplicate copy of all your animation) and choose MASK.
This will turn your animation into a mask layer, the blank layer underneath becomes a sublayer (the level that will later by effected by your mask).
Make your Mask layer an outline so that you can keep track of the amount of space the mask will cover, and lock the mask layer.
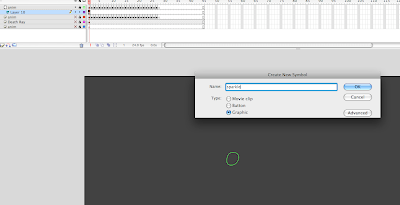
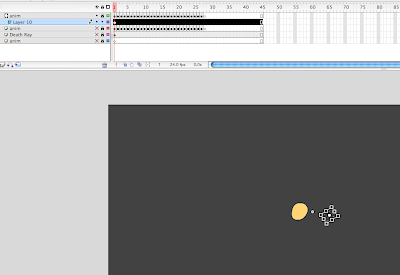
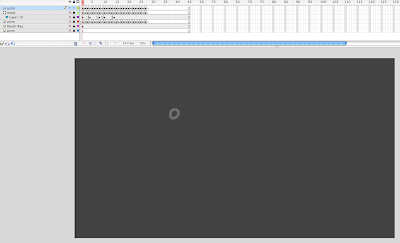
On the layer underneath click on the blank keyframe then go to Insert > New Symbol.
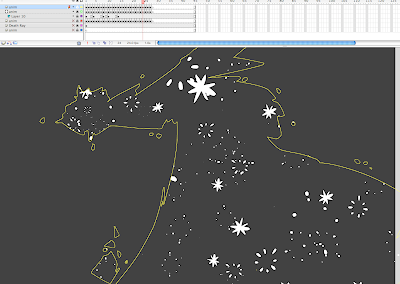
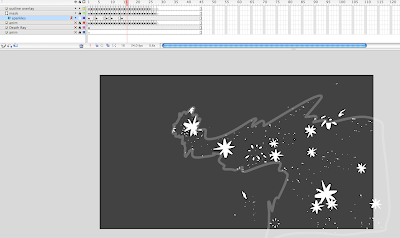
Create a single cycle of a small star twinkle, a bubble pop, any sort of 4 to 8 frame sparkle / fizzy pop sort of thing.
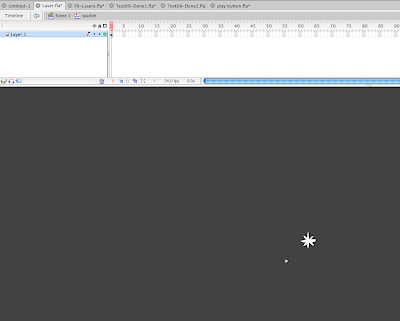
Once complete, go back to your main scene timeline, drag over your symbol from the LIBRARY to the stage.
Then begin copy/pasting this symbol, over and over, each one change the scale, rotation, and even flip a few over vertically and/or horizontally to create tons of variety.
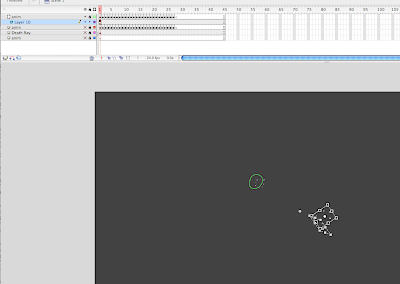
As you go through the timeline, keyframe and add more symbols and clusters of symbols of the sparkle symbol, go through and select random individual ones and change at what point they begin. This creates even more randomness, appearing as though you animated a sea of twinkle sparks. In this case I had a 6 frame cycle, so most of the symbols I select one at a time I change the First box in the Properties Panel: from 1 to 2, 3, 4, 5 or 6.
Remember, you can only see the effects of the mask when you have both the mask layer and its sub-layer both locked.
PART 3
Create a New Layer.
Now take your original animation again and duplicate it on to another layer on top of all the other layers.
Lock and Hide all other layers.
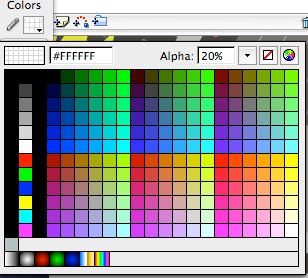
Choose your stroke color to a semi-transparent white ALPHA color.
Go in frame by frame and click on all the paint with the INK BOTTLE tool (choose the thickness of the stroke to 10).
This may be difficult to do if you have lots of tiny bits. but the purpose of this is to create a nice softened edge to at least the main (larger) shape of your laser beam.
Do this for every frame.

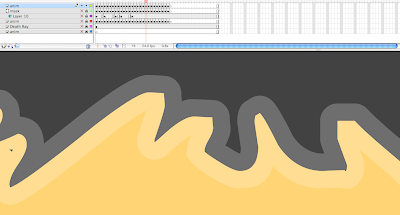
As you can see when you zoom in close the stroke thickness covers as much on the outside of the outline as it does on the inside, so the color of your outlines and your paint fills will give differetn effects depending on how transparent you set the alpha and how dark (or light) you set the colors of the laser itself (which will show through underneath).
Now click on your ERASER tool from the tools panel, change the settings of the eraser to ERASE FILLS.

Go in frame by frame and erase the colored paint (leaving the outlines intact).
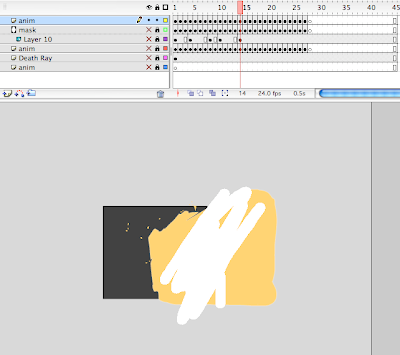
To help make this easier, use the biggest eraser brush and zoom out as far as you can go, this will make the task go much faster.
Locking the layers and making them all visible (except the bottom few layers which holds you original animation), you'll notice the alpha-outlined shape encasing the masked twinkle sparks.
PART 4
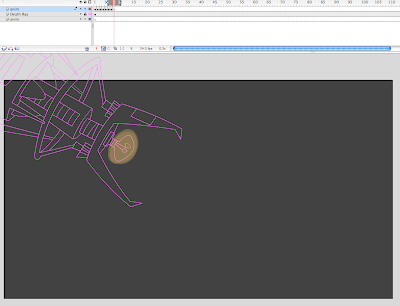
Once again copy all your keys of the original animation to the BOTTOM layer underneath the prop layer.
click the EDIT MULTIPLE FRAMES button, drag the small knobs over to cover the whole range of the time line, hit CTRL+A to select all the art on ONLY that bottom layer (make sure all other layers are locked and hidden). Change the color to all the animation at once, usually a lighter color than the original base color works best, close to a white color will do. If your original base color was quite light or highly saturated, perhaps a deeper hue will work best, it depends on the background color you choose later.
Then click on each individual frame and COVERT TO SYMBOL (F8) each separate frame of animation.
Make sure each one is MOVIE CLIP symbol. Otherwise all symbol you create must be Graphic Symbols. But in this case MOVIE CLIP symbols are vital for the back lit glow effect.
Once you've converted the artwork on each individual frame to it's own symbol (on this case 27 symbols) click the EDIT MULTIPLE FRAMES button, drag the small knobs over to cover the whole range of the time line, hit CTRL+A to select all the art on ONLY that bottom layer (make sure all other layers are locked and hidden).
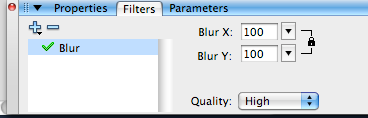 Open the Filters Panel, click on the Plus sign, choose BLUR, raise the numbers to whatever amount you would like to see, the greater the number the more diffused the glow will appear. Set the quality to high.
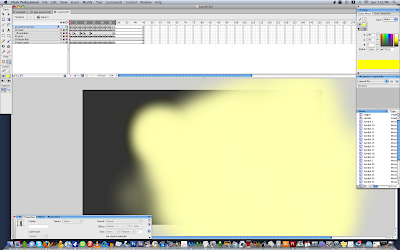
Make your original animation layer visible and compare how the back lit glow looks with the other layers overlapping it. Adjust accordingly.
PART 5
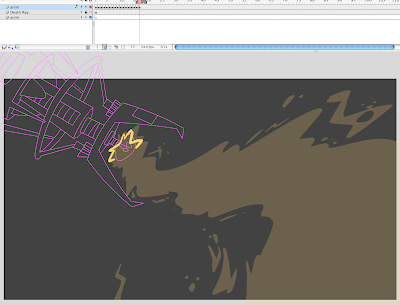
Now for the final touch. A bit of lighting FX.
This may not be appropriate depending on the style you're going for, or how the scene plays out with the background elements.
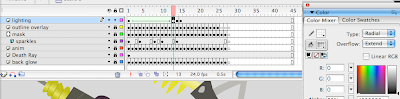
Create a new layer over top all other.
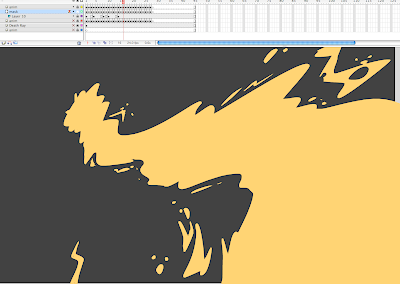
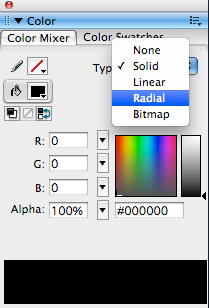
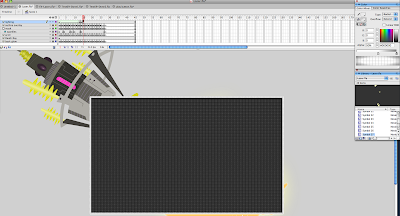
With the RECTANGLE tool cover the whole scene with a new shape.
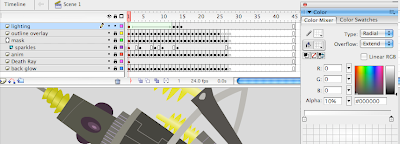
Adjust the fill of that shape with a radial gradient.
In this case I went with a black 20% to 0% alpha gradient, clicked and dragged the source of the gradient tool so it's center is just in front of the muzzle of the laser beam.
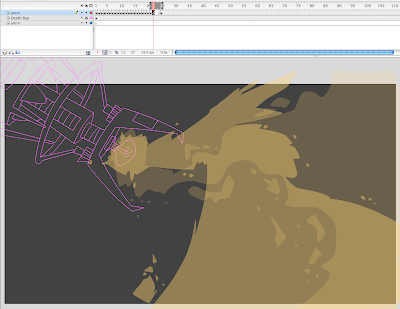
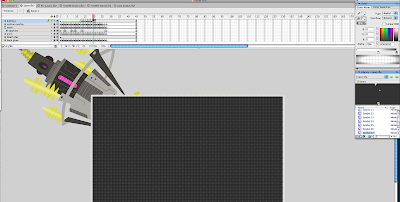
Then keyframe down the timeline (at the point where the laser begins to cover more space) and change the gradient again to make the more opaque part of the gradient LESS transparent / more black). this will help put more focus on the beam and give the illusion the beam is intensifying in brightness by making everythign else gradually get darker and the a bit f a strobe light effect during th big blast (or cycle) portion of the animation.
Set you first key frame to a shape tween to activate the morph of the color effect.
Then key frame a few afterwards during the portion where the beam dissipates, and gradually reduce the transparency of the radial gradient so that it disappears, thus fading away the lighting effect.

Make sure you have blank keyframes inserted where you need to so that certain elements don't stick around past the timing of your animation.
Select all the frames and copy the frames into it's own symbol if you'd like, then you isolate all the animation into a single (easy to manipulate) keyframe.
Here's two more samples, with the same technique, just using different colors, and design styles.
Let's start with the actual foundation of it and that's the actual animation of the beam or energy blast shooting out. Whether it's a cycle or just one big burst, you must create (or maintain the pre-established) the design, keeping it consistent with itself (and perhaps the series or film you are doing the FX for).
With the brush tool, here you see how I went in frame by frame (on 1s) and drew in a Ghostbusters style proton beam bursting out. No cycle in this version, though it's easy to incorporate one between the energy 'build-up' and the 'dissipation' portions on your timeline.

Get your prop ready, in this case a cartoony Death Ray device from some Mad Scientist's laboratory. Make it an outline by clicking on the small box on its layer, create a new blank layer above and below the prop, lock all the layers except the top one and work on this top layer, with the prop layer set to OUTLINE, you can see through it. Activate your ONION SKIN Button just below your timeline, now start drawing.


With that onion skin on you can copy frames over and make sure your drawings 'hook-up' if you do indeed have a cycle amongst the animation. A possible scenario would be 10 frames of the beam activating, then a 6 frame cycle as it repeats a few times then another 6 frames of the beam deactivating and the proton stream dissipating. You'd be surprised how rough you can keep your lines and shapes as well, since it moves or 'vibrates' quite fast you can get away with alot. If you like to work very rough, then make a second pass to clean up your lines.
Once complete pick you color(s) and and paint in all the shapes and gaps and any small bits of electricity or speckles trailing off or sparking from the beam.
PART 2

Once you've animated your beam, copy the keys to a new layer.
Click the new layer button, click and drag to select all the frames and then drag them over to the new layer while holding ALT down.
Lock and hide all other layers.
Select this new top layer holding a duplicate copy of all your animation.
Make a new layer on top of that again.
Drag this new layer down one level, then right click on the top layer (the same one holding a duplicate copy of all your animation) and choose MASK.
This will turn your animation into a mask layer, the blank layer underneath becomes a sublayer (the level that will later by effected by your mask).

Make your Mask layer an outline so that you can keep track of the amount of space the mask will cover, and lock the mask layer.
On the layer underneath click on the blank keyframe then go to Insert > New Symbol.
Create a single cycle of a small star twinkle, a bubble pop, any sort of 4 to 8 frame sparkle / fizzy pop sort of thing.


Once complete, go back to your main scene timeline, drag over your symbol from the LIBRARY to the stage.
Then begin copy/pasting this symbol, over and over, each one change the scale, rotation, and even flip a few over vertically and/or horizontally to create tons of variety.


As you go through the timeline, keyframe and add more symbols and clusters of symbols of the sparkle symbol, go through and select random individual ones and change at what point they begin. This creates even more randomness, appearing as though you animated a sea of twinkle sparks. In this case I had a 6 frame cycle, so most of the symbols I select one at a time I change the First box in the Properties Panel: from 1 to 2, 3, 4, 5 or 6.

Remember, you can only see the effects of the mask when you have both the mask layer and its sub-layer both locked.
PART 3
Create a New Layer.
Now take your original animation again and duplicate it on to another layer on top of all the other layers.
Lock and Hide all other layers.
Choose your stroke color to a semi-transparent white ALPHA color.

Go in frame by frame and click on all the paint with the INK BOTTLE tool (choose the thickness of the stroke to 10).
This may be difficult to do if you have lots of tiny bits. but the purpose of this is to create a nice softened edge to at least the main (larger) shape of your laser beam.
Do this for every frame.


As you can see when you zoom in close the stroke thickness covers as much on the outside of the outline as it does on the inside, so the color of your outlines and your paint fills will give differetn effects depending on how transparent you set the alpha and how dark (or light) you set the colors of the laser itself (which will show through underneath).
Now click on your ERASER tool from the tools panel, change the settings of the eraser to ERASE FILLS.

Go in frame by frame and erase the colored paint (leaving the outlines intact).


To help make this easier, use the biggest eraser brush and zoom out as far as you can go, this will make the task go much faster.

Locking the layers and making them all visible (except the bottom few layers which holds you original animation), you'll notice the alpha-outlined shape encasing the masked twinkle sparks.
PART 4
Once again copy all your keys of the original animation to the BOTTOM layer underneath the prop layer.
click the EDIT MULTIPLE FRAMES button, drag the small knobs over to cover the whole range of the time line, hit CTRL+A to select all the art on ONLY that bottom layer (make sure all other layers are locked and hidden). Change the color to all the animation at once, usually a lighter color than the original base color works best, close to a white color will do. If your original base color was quite light or highly saturated, perhaps a deeper hue will work best, it depends on the background color you choose later.
Then click on each individual frame and COVERT TO SYMBOL (F8) each separate frame of animation.
Make sure each one is MOVIE CLIP symbol. Otherwise all symbol you create must be Graphic Symbols. But in this case MOVIE CLIP symbols are vital for the back lit glow effect.
Once you've converted the artwork on each individual frame to it's own symbol (on this case 27 symbols) click the EDIT MULTIPLE FRAMES button, drag the small knobs over to cover the whole range of the time line, hit CTRL+A to select all the art on ONLY that bottom layer (make sure all other layers are locked and hidden).

 Open the Filters Panel, click on the Plus sign, choose BLUR, raise the numbers to whatever amount you would like to see, the greater the number the more diffused the glow will appear. Set the quality to high.


Make your original animation layer visible and compare how the back lit glow looks with the other layers overlapping it. Adjust accordingly.
PART 5
Now for the final touch. A bit of lighting FX.
This may not be appropriate depending on the style you're going for, or how the scene plays out with the background elements.
Create a new layer over top all other.
With the RECTANGLE tool cover the whole scene with a new shape.
Adjust the fill of that shape with a radial gradient.
In this case I went with a black 20% to 0% alpha gradient, clicked and dragged the source of the gradient tool so it's center is just in front of the muzzle of the laser beam.


Then keyframe down the timeline (at the point where the laser begins to cover more space) and change the gradient again to make the more opaque part of the gradient LESS transparent / more black). this will help put more focus on the beam and give the illusion the beam is intensifying in brightness by making everythign else gradually get darker and the a bit f a strobe light effect during th big blast (or cycle) portion of the animation.
Set you first key frame to a shape tween to activate the morph of the color effect.
Then key frame a few afterwards during the portion where the beam dissipates, and gradually reduce the transparency of the radial gradient so that it disappears, thus fading away the lighting effect.


Make sure you have blank keyframes inserted where you need to so that certain elements don't stick around past the timing of your animation.
Select all the frames and copy the frames into it's own symbol if you'd like, then you isolate all the animation into a single (easy to manipulate) keyframe.
Here's two more samples, with the same technique, just using different colors, and design styles.
Joseph Gilland's Amazing Effects Book!

Joseph Gilland's definitive manual on the Art of Special Effects Animation is pretty much the only guide out there for 2D FX animators, it's a great read with fantastic visuals, with plenty of references from Michel Gagne.
Buy it here on Amazon.
This is the book description:
A richly illustrated full-color guide to creating stunning hand-drawn and digital special effects by Joseph Gilland, whose work has been seen in films such as Lilo & Stitch, Mulan, and Brother Bear. Create amazing animated effects such as fiery blazes, rippling water, and magical transformations. Animation guru Joseph Gilland breaks down the world of special effects animation with clear step-by-step diagrams and explanations on how to create the amazing and compelling images you see on the big screen. 'Elemental Magic' is jam-packed with rich, original illustrations from the author himself which help explain and illuminate the technique, philosophy, and approach behind classical hand drawn animated effects and how to apply these skills to your digital projects.
Subscribe to:
Posts (Atom)